Not the alphabet in order, and not twenty copies of a grey letter. Seven steps, from the way the pencil is held to the first letter written alone, with how long each should take and what to do when it goes wrong.
Before you start
If you are working out how to teach a preschooler to write letters at home, three things make it go well, and none of them is a worksheet.
The first is timing. A child is ready for letters when the pencil is held with the fingers, when they can draw a line from one dot to another and stop, and when they can copy a circle and a cross. Most children draw a circle at 3 and a cross at about 4 (CDC; Solihull NHS occupational therapy). If those are not there yet, the steps below still apply, but you will spend longer on the first three and should not expect a letter for a while. When do children learn to write letters? has the signs in full.
The second is the length of a session. Five to ten minutes, once a day, is more than most preschools manage and is the ceiling for a 3 year old. One page, then stop, while it is still going well. A child who finishes a page and wants another has learned more than a child who was kept at it for twenty minutes, because the second child has also learned that writing is the thing that goes on too long.
The third happens away from the table. The hand that writes is built by play that has nothing to do with letters: rolling and pinching playdough, tearing paper into strips, pegging socks on a line, threading big beads, picking up small things with the fingers or with kitchen tongs. A few minutes of that most days is the groundwork a grip is built on, and it is no less useful for not looking like school. Letters are also easier to write once they are known by sight, so point them out on signs and packets, and start with the ones in the child’s own name, the letters a child usually cares about first. How to teach a child to write their name starts there.
Step 1: the grip
Show the grip before the first line, not after the first letter. A grip that is set wrong at 3 is a habit by 5, and the first thing a teacher notices in September.
The grip to aim for is the pencil pinched between the thumb and the first finger, resting on the middle finger, with the hand relaxed and the paper tilted a little. It does not have to be perfect at 3; many children hold the pencil with four fingers until 4 or 5, and that is fine as long as the fingers and not the fist are doing the steering. By 4, most children hold a crayon between the fingers and thumb rather than in a fist (CDC).
Three things help without a word being said. A short pencil, or a crayon snapped in half, cannot be held in a fist. A small object, such as a cotton ball or a coin, held against the palm by the two little fingers keeps them out of the way. And your own hand, holding your own pencil beside theirs, shows the grip better than any explanation.
Left-handed children hold the pencil the same way, mirrored, with the paper tilted the other way so the hand sits below the line and does not cover what it just wrote. Show a left-handed child a left hand; a picture of a right hand is no use to them.
Step 2: lines and curves
Letters are made of a small number of strokes: straight down, straight across, a slant, a curve that goes round, and a curve that stops and turns back. A child who can draw those strokes can draw any capital. A child who cannot is being asked to invent the letter and the movement at the same time.
So the first pages are lines. Down, across, slants, curves, zigzags, each with a dot to start on and a direction to go in. Then paths: a road to follow, a maze to get through, a wave to ride. This is where the hand learns to start where it is told, go one way, and stop. It is also where tracing is at its most useful, because the goal is control rather than a shape the child has to remember. Pre-writing strokes goes through the strokes in order and says which letters each one opens.
Expect to spend two to four weeks here with a 3 year old, less with a 4 year old who already draws. Move on when the lines land on the line and the pencil stops where the line stops.
Step 3: shapes
A circle, a cross, a square, a triangle. The circle is the curve that closes; the cross is two straight lines that meet; the square adds corners; the triangle adds diagonals. Between them they hold every movement the capitals need, and a child who can copy a triangle can write an A.
Draw the shape, then have the child trace it, then copy it beside yours, then draw it with nothing to copy. That sequence, trace, copy, write, is the one every letter will follow, so it is worth learning on a circle, where getting it wrong costs nothing.
Step 4: capitals, one at a time
Start with the capitals, not the lowercase letters. They are made of straight lines and simple curves, they all start at the top, they are easy to tell apart, and they are the letters in the child’s own name on their coat peg. The lowercase letters come a year later, and there is a longer argument for it in uppercase or lowercase first?.
Do not teach them in alphabetical order. A is three diagonals, which is one of the hardest things a 3 year old’s hand can do, and B is two curves that have to meet a line. Teach them by stroke instead: the straight-line letters first (L, T, I, H, E, F), then the ones that add a curve (D, P, B, R), then the circles (O, C, G, Q), then the slants (A, K, M, N, V, W, X, Y, Z), with S and J last because their curves have to change direction. That is roughly the order the main school handwriting schemes use, and it means every new letter uses one new thing and several the child already has.
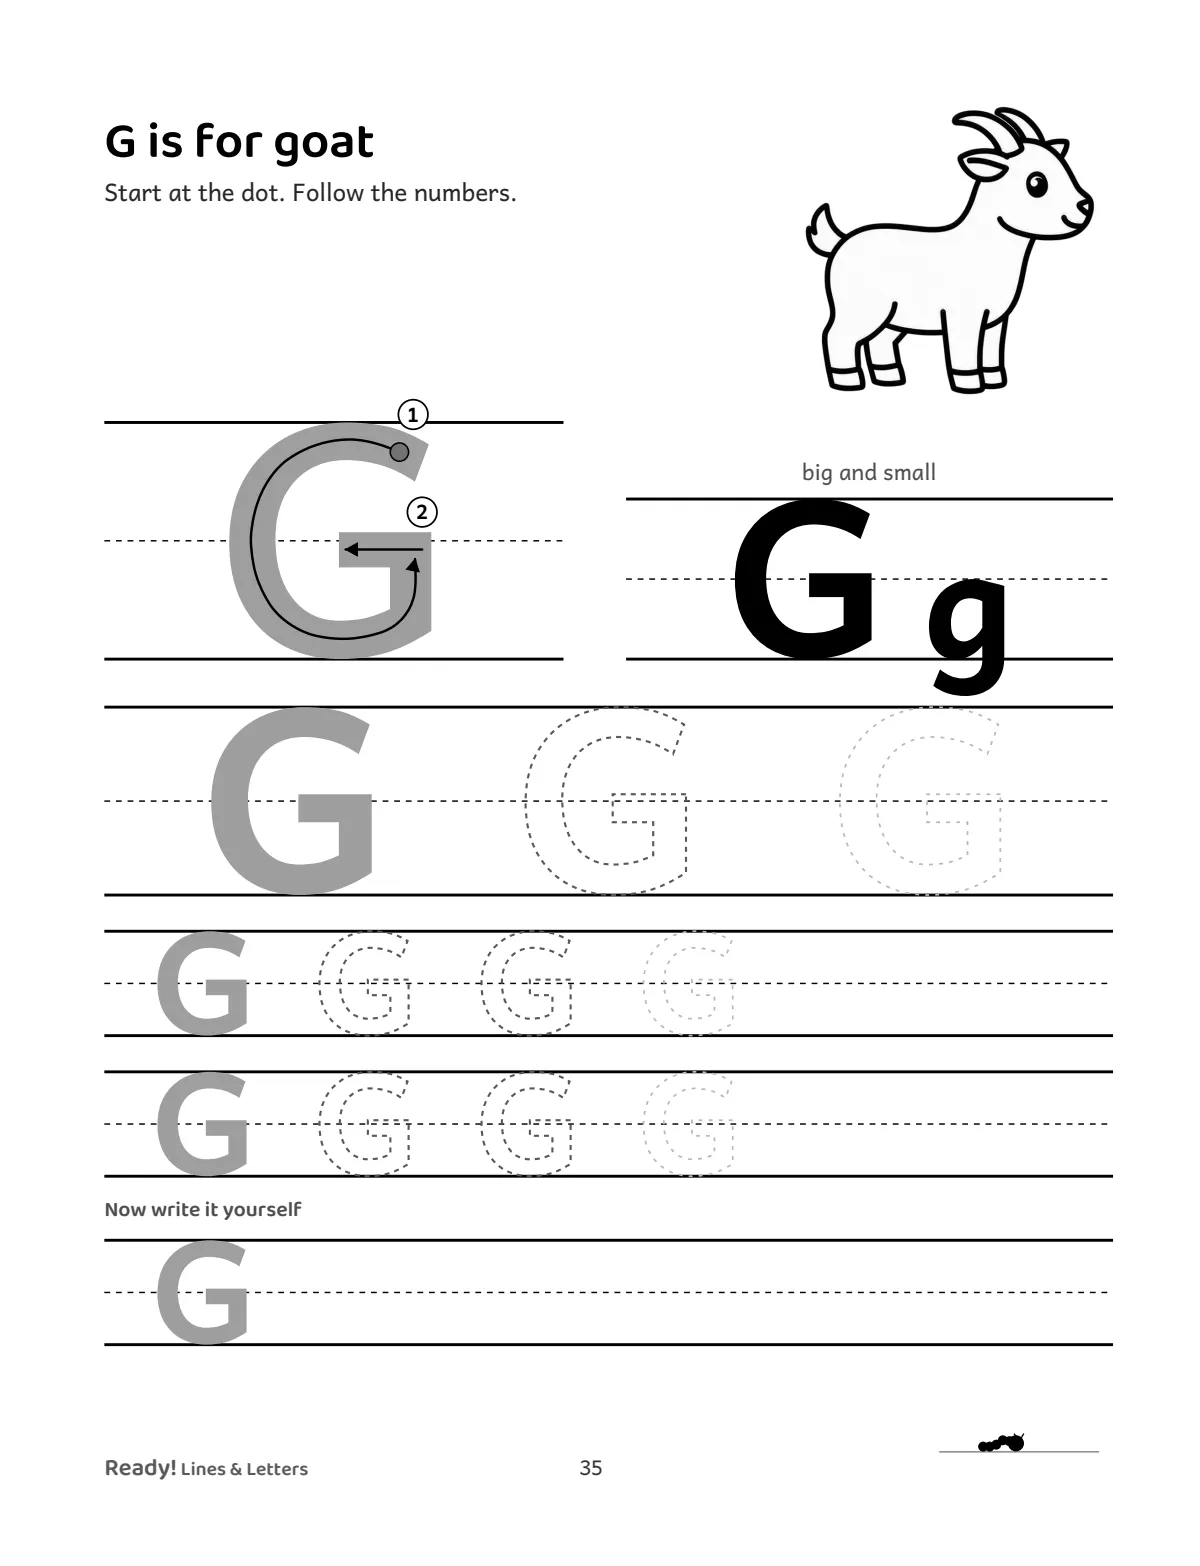
For each letter, the model has to say two things: where to start and which way to go. A dot at the start and numbered arrows along each stroke do that. A grey outline does not, and a child tracing a grey outline will start at the bottom, go clockwise, and lift the pencil in the wrong place, every time, with no way to know. The stroke order matters more than it looks, because a letter formed the wrong way round is slow to write for years, and it is the thing a school will have to unteach.
Say the strokes out loud as the child makes them: “down, across, across” for E. Children remember the words before they remember the movement, and the words carry the order.
If you want to see what a model with a dot and arrows looks like before you buy anything, two pages from Book 1 are free to print, the letters A and S: on A4 or on US Letter.
Step 5: the row that fades
The row under the model is where the learning happens, and most books get it wrong in one of two ways. Either the child traces the same grey letter ten times, which is ten repetitions of being carried, or the page jumps from one traced letter to a blank line, which is a cliff.
The row that works gives less help at each step. First a solid model with its dot and arrows, which the child traces. Then a dotted letter, which still shows the shape but makes the hand supply the line. Then a faint one, barely there, which the hand mostly supplies alone. Then an empty space, where the child writes the letter with nothing to follow. The child’s own letter ends up on the same line as the model, so you can both look at the two together, and the next row starts the fade again.
You can do this on paper at home: write the letter in dark pencil, then in dots, then in the lightest line you can make, then leave a gap. A book that prints the fade on every row saves you doing it twenty-six times.
Step 6: the right row height
A 3 year old cannot keep a letter inside a half-inch row, and nobody should ask them to. Their letters are big because the movement comes from the arm and the wrist, and the rows should be big to match. The heights we use are our own judgment, not a standard: three quarters of an inch from the bottom line to the top at 3 and 4; five eighths of an inch at 5, when the hand has steadied; and half an inch at 6, about what a school exercise book gives them.
If the only paper to hand is narrow, turn it sideways and rule your own lines. A child whose letters spill over a small row is told, by the page, that they are doing it wrong, when the page is the thing that is wrong.
Step 7: from letters to the name, and on
The first word every child wants to write is their own name, and it is the right first word: it is the one they will write most, it is short, and they already know what it says. Once the capitals in it are there, put them together: trace the name, copy it, write it. How to teach a child to write their name has the steps, and the two mistakes that make it harder than it needs to be.
After the name, the sequence starts again a size down: lowercase letters, then numbers, then first words, each with a start dot and a fade, in a shorter row. That is a year’s work, and it is the work of Book 2 and Book 3.
When it goes wrong
The letter is backwards. Normal in the first years of school; five and six year olds reverse the letters that face left, like d and J, most often (Treiman and colleagues, 2014). Point out where the letter starts and which way the first stroke goes, and let the rest fade with practice.
The letter is enormous. The row is too small, or the child is not ready for a row at all. Go back a step: shapes without lines, then shapes in a box, then a letter in a tall row.
They will not sit. Five minutes is the session. If five minutes is too long, the hand needs more play and less paper: chalk, playdough, beads, scissors, and come back in a month.
They traced it fine and cannot write it alone. Tracing taught the movement but not the memory. Use the fade: the dotted and faint copies are the bridge, and a child who jumps from solid to blank will fall into the gap. Is tracing good for learning to write? explains why the step in between matters.
They hate it. Stop for a while. A 4 year old who dislikes writing at 4 will often love it at 4 and a half, and nothing is lost by waiting, where a great deal is lost by pushing.
What a good book does for you
A book cannot hold the pencil, but it can do everything else above: open with the grip, spend its first pages on lines and shapes, give every capital a start dot and numbered arrows in a sensible order, fade every row from a model to a blank, and print the rows tall enough for the hand that is using it. If you are choosing one, the best letter tracing books for preschoolers, compared sets eight of them side by side on exactly those points.
Sources
- Centers for Disease Control and Prevention. Milestones by 3 years, 4 years and 5 years. Learn the Signs. Act Early.
- Solihull Children’s Occupational Therapy Service, University Hospitals Birmingham NHS Foundation Trust. Pre-writing skills. The ages for each pre-writing shape, given as a guide only.
- Treiman, R., Gordon, J., Boada, R., Peterson, R. L., and Pennington, B. F. (2014). Statistical learning, letter reversals, and reading. Scientific Studies of Reading, 18(6), 383 to 394.