Yes, as a first step, and no, as the only step. Tracing gives a small hand the movement of a letter before it can remember the shape. The question is what comes between the traced letter and the one written alone.
What tracing does, and what it does not
Whether tracing letters is good for learning to write depends on what a letter is, and a letter is two things: a shape to remember and a movement to make. An adult who knows the alphabet forgets that the two are separate, because for an adult the shape and the movement arrive together. For a 3 year old they do not. The child can recognise an A on a sign and still have no idea where a pencil would start on it, or which way it would go.
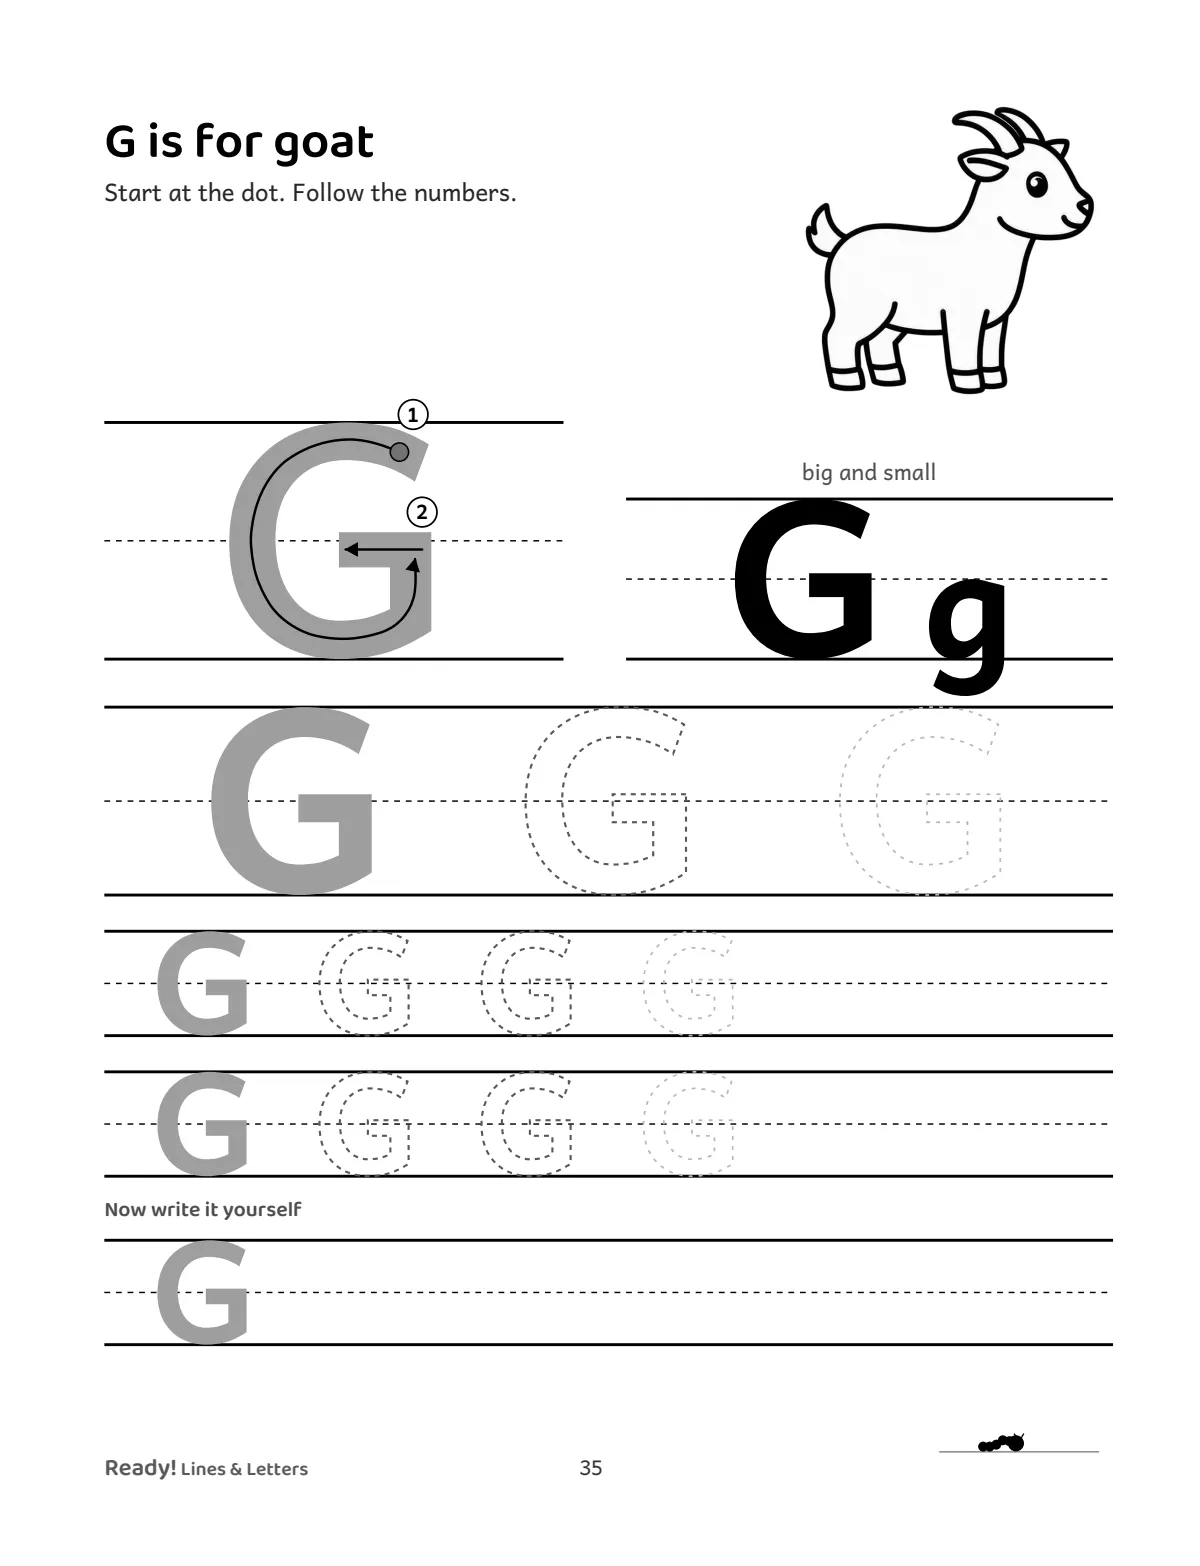
Tracing teaches the movement. A model with a start dot and numbered arrows tells the hand where to begin, which stroke comes first, and which way each one travels, and the hand learns the route by travelling it. That is a real thing to learn, and for a hand that has never made the movement it is the only sensible way to learn it. Nobody learns a dance by being told to do it alone.
What tracing does not teach is the memory of the shape. A child who has traced the letter B ten times has made the movement ten times with the shape in front of them, and has never once had to produce it from nothing. Ask that child to write a B on a blank line and you often get a long pause, a backwards one, or a P. The tracing worked; it just was not the whole job.
Why so many tracing books disappoint
Most tracing books fail in one of two ways, and both come from treating tracing as the whole job.
The first is the grey letter, twenty times. A row of identical grey outlines gives the child twenty rides on the same track. The twentieth is no harder than the first, so the hand never does more of the work, and the page ends with a child who can trace a B and still cannot write one. It also teaches something unhelpful: that writing is colouring in.
The second is the cliff. The page shows one traced letter and then a blank line, and the child is expected to cross from full support to none in a single step. Some children manage it. Most look at the blank line, look at you, and produce the letter they already knew how to draw, which is not the one on the page.
There is a third problem, less common but worse: the model with no arrows. A grey outline with no dot and no direction is traced however the child likes, which is usually from the bottom, clockwise, with the pencil lifted in the middle of a stroke. The child learns a route, because tracing teaches routes, and the route is wrong. A school will spend a term undoing it.
The step in between
What is missing from both kinds of page is a step between tracing and writing, and it can be built into the row itself.
Picture one line of practice. At the left is the model, solid, with its start dot and numbered arrows; the child traces it, and the hand learns the route. Next is the same letter in dots. The shape is still there to see, but the line is not, so the hand has to supply it; the child is now half tracing, half writing. Next is the letter again, very faint, barely more than a hint of where it goes; the hand is doing nearly all the work and the page is giving the last small nudge. Then an empty space, and the child writes the letter with nothing to follow.
Four steps, one line, and the support leaves one step at a time. The child’s own letter ends up beside the model, so you can look at the two together, and the row below starts the fade again. Nobody crosses a cliff, and nobody takes twenty identical rides.
That is also why the fade is better than a page that alternates traced rows and blank rows. The blank row on its own is still the cliff, just a smaller one; the dotted and faint steps are what make the gap crossable.
When tracing is exactly right
Tracing is at its best before letters, on lines and shapes. A 3 year old tracing a wavy line or a path through a maze is learning to start where the dot is, go one way, keep the pencil on the paper and stop where the line stops. There is no shape to remember, so there is nothing tracing fails to teach, and the control it builds is the control every letter will need. Pre-writing strokes is about those pages and the order they come in.
It is also exactly right for the first meeting with each new letter. The first time a child meets a K, the three strokes in the right order are new information, and tracing them with the arrows is how the information gets into the hand. The mistake is not the first trace; it is the nineteenth.
And it is right for a letter that has gone wrong. A child who has settled into drawing an S from the bottom can be reset by a few traces of a model with the dot at the top, in a way that no amount of “start at the top” will manage.
When tracing stops helping
Tracing stops helping at the moment the child could have done it alone. That moment comes sooner than most books assume: often after two or three traces of a new letter, and after one of a letter met the week before. Past that point every extra trace is a ride the child did not need, and the real work, the dotted and faint copies and the blank space, is what is being put off.
A simple test: cover the model and ask for the letter. If it comes, with the right start and the right strokes, stop tracing that letter and spend the time on the one after it. If it does not come, the child is not ready to stop tracing yet, but they are ready for the dotted step, which is the one to give them next.
Tracing also stops helping when it becomes the whole of handwriting at home. A child who only ever traces learns that writing means following a line. The fade fixes that inside each row, and so does writing for a reason: their name on a drawing, a label on a jar, a sign for the bedroom door.
Tracing and copying
Parents sometimes ask whether copying, which is writing a letter from a model beside the line rather than over it, is better than tracing. It is not better; it is later. Copying asks the hand to make the movement and the eye to hold the shape, which is the second step, not the first. The faint letter in the fade above is, in effect, copying with a safety net, and the blank space after it is copying without one, because the model is still there at the left of the row.
So the honest answer to “tracing or copying” is “tracing, then dotted, then faint, then copying”, on one line, for each letter, until the letter comes on its own.
What to look for in a tracing book
If tracing is the first step and not the whole job, a tracing book should show that in its pages. A start dot and numbered arrows on every model, not just the first few. Rows that fade from the model to an empty space, rather than rows of the same grey letter. Lines and shapes before the first letter. And rows tall enough for the hand using them, which for a 3 year old is three quarters of an inch.
To see the fade on paper, two pages from Book 1 are free to print, the letters A and S with their start dots and numbered arrows and the rows below them: on A4 or on US Letter. No email, no form.
Those are four of the seven criteria in the best letter tracing books for preschoolers, compared, which sets eight books side by side and says, for each, whether its models carry arrows and whether its rows fade. For a step-by-step method of teaching the letters at home, with tracing in its place, see how to teach a preschooler to write letters.